

Fishing knots can either make your life easier or make your life harder. The difference is whether you know when and how to use them. In the world of fly fishing, there are a select number of fishing knots that are designed for very specific purposes, which can improve how many fish you catch. Whether you're connecting fly fishing flies to tippet, tippet to leaders, leaders to fly line, or fly line to backing, there are 8 different fishing knots that can accomplish all of these tasks
Below we've listed the best eight fly fishing knots you should know and how to use them.
Table Of Content
- Surgeon's Knot
- Improved Clinch Knot
- Blood Knot
- Nail Knot
- Davy Knot
- Non-Slip Loop Knot
- Perfection Loop Knot
- Barrel Backing Knot
Surgeon's Knot
Tippet to Tippet / Tippet to Fly Leader

The Surgeon's Knot is used to connect two separate sections of tippet together or tippet to your fly leader. Our staff uses this all the time out on the water to extend our leaders with a new section of tippet. This makes it easier for us to make delicate casts and make our leaders last longer.
It definitely is not as strong as a Blood Knot but makes up for its lack of strength with how quickly you can tie the Surgeon's Knot. It's a rather easy knot to learn and is still decently strong.
- Position your new section of the tippet off to the right and the leader on the left. In this example please refer to the image above. Dark grey is your leader and light grey is your tippet.
- Roughly 3 to 4-inches of tippet and leader should be side-by-side.
- Pinch the leader and tippet together into a loop.
- Take the tag end of your leader and make two complete wraps around the inside of the loop.
- Next, take the long section of the tippet that extends off to the right and make two complete wraps around the inside of the loop over the top of the wraps you just made in Step 4 with the tag end of the leader.
- Finally, wet the knot and pull tight.
- Snip the tag end of the leader and tippet nearly flush with the knot.
Improved Clinch Knot
Fly to Fly Leader
The Improved Clinch Knot is one of the most popular knots fishermen use to attach flies to your fly leader. It's incredibly easy to tie the Improved Clinch Knot and is extremely strong. We use this knot every time we are out on the water and never have issues with breakages.
- Feed the end of your leader through the eye of the hook.
- Make 5-6 wraps around your leader while leaving a small loop at the front.
- Pass the end of the lead back through the small loop at the front made during Step 2.
- Pull it back through the large loop.
- Finally, wet the knot and pull tight.
- Snip the tag end of the leader and tippet nearly flush with the knot.
Blood Knot
Tippet to Tippet and Fly Leader to Tippet
The Blood Knot is one of the strongest knots to use to connect similar diameter tippet sections to construct or add length to your fly leaders. It's known for its smoothness and ability to turn over tapered leaders with ease when casting. Its long, smooth shape allows it to slip easily through your rod guides and helps prevent picking up river slim in the water.
- Overlap 4-6 inches of two line segments being joined. Start with the lighter weight segment in your right hand and the heavier segment in your left hand.
- Place the segment in your right hand over the left segment.
- Make wrapping 4 -5 wraps toward you.
- After wrapping, bring the end back through to where the two segments intersect. Pinch the intersection point with your thumb and index finger to keep it from unraveling and to keep the intersection open.
- Start making 4-5 wraps of the heavier segment the opposite way -- pushing away from you while wrapping.
- Run the tag end through the open hole of the intersection in the opposite direction as the first segment.
- While making sure the tags do not pull out, lubricate the knot and pull tight.
- Snip the tag end of the leader and tippet flush with the knot.
Nail Knot
Fly Line to Fly Leader
The Nail Knot is a compression knot used to attach the butt section of your leader to your fly line using a nail or bodkin needle. Most commercially available fly lines come with a loop on the end to provide an easy loop-to-loop connection for attaching a new leader. However, you you prefer a more slim and clean setup using a Nail Knot is the alternative. Done correctly, it will never slip and is smooth enough to be fed through your fly rod guides without getting stuck.
- Find a nail, bodkin needle, or item to use that has a smooth surface and roughly the same diameter or thickness as your fly line. It will make the following steps much easier to complete.
- Hold your fly line and nail in your left hand.
- Align the tip of the fly line and the tip of the nail.
- Place the butt leader next to the nail with the butt section of the leader facing the left and the remainder of the leader extending out to the right.
- Next, place the skinny end of the leader in your left hand and align the tip of the leader with the tips of the fly line and nail. This should form a large loop within the leader.
- Start wrapping the right side of the loop toward the left hand back over top of everything, the fly line, nail, fat and skinny end of the leader.
- Make a minimum of 4-5 turns and hold the wraps in place with your index finger of your left hand.
- While holding the wraps with your left index finger, pull the skinny end of the leader with your right hand to the right. This will feed the large loop through the knot to tighten.
- Gently remove the nail from the knot while holding firm the wraps with your index finger and thumb. Do not let go of the knot until the knot is completely tightened.
- While firmly rolling the knot between your thumb and index finger, gently tug the knot tight by using the skinny end and butt end of the leader.
- Trim the tag ends.
For better instructions, please watch this video here.
The Davy Knot
Fly to Fly Leader
One of the fastest and easiest knots to learn for attaching your flies to your fly leader. It is just as strong as an Improved Clinch Knot and uses less line than an ordinary knot.
- Feed the end of your fly leader through the eye of the hook.
- Pull the line through to create a simple over-hand knot. Do not pull tight and leave a little loop for the next step.
- Take the end tag of the over-hand knot and feed it over and back through the loop you just created.
- Pull tight and snip the tag end.
Non-Slip Loop Knot
Fly to Fly Leader

The Non-Slip Loop Knot is a simple little knot for giving wet flies and streamers freedom of movement. Using one allows the flies to have a more natural presentation in the water as it swings across the current. As it swings the fly can slide and twist along the loop to imitate the exact action drifting insects would have in that same current.
- Make an over-hand knot a few inches from the end of your fly leader.
- Without pulling the over-hand knot tight, feed the end of your leader through the eye of the hook.
- Make 3 - 5 wraps forward on your leader.
- Feed the end of your leader back through the loop within your over-hand knot.
- Pull tight and snip the tag end.
Perfection Loop Knot
Loop-to-Loop Connection
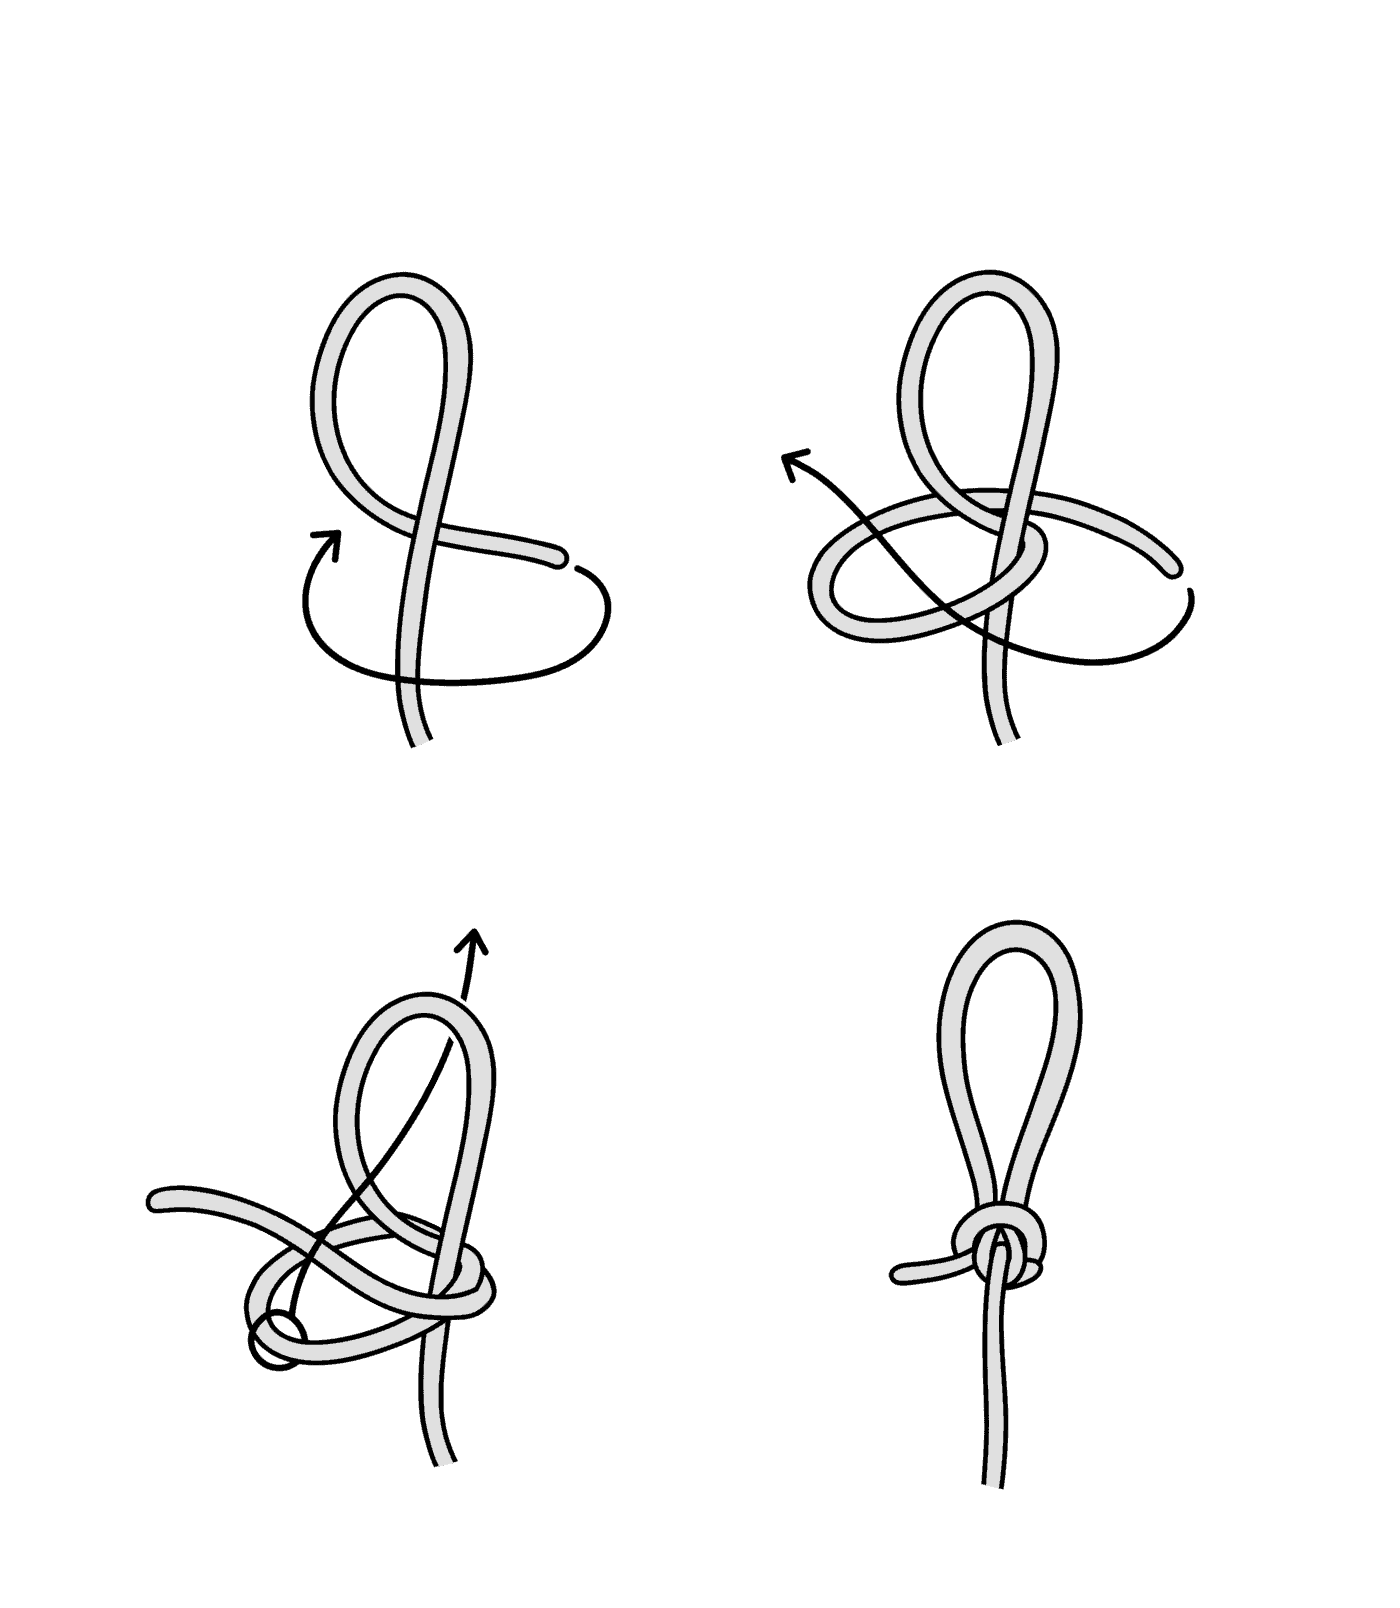
Perfection loops are commonly used for making loop-to-loop connections from your fly line to your leader. Most commercially available leaders and fly lines come with a perfection loop right out of the box. They are also used for adjustable dry fly rigs or even nymphing rigs.
- Hold the end of your line in your left hand.
- Form a loop so that the running end goes behind the loop.
- Loop the running end around again creating another loop over top of the first loop. The running end should go back behind the loops again. Pinch into position.
- Open up the space between the two loops and lay the running end between the two loops.
- Reach up through the first loop and grab the second loop and pull tight.
Barrel Backing Knot
Adjustable Dry Fly Rigs and Adjustable Sighters for Nymphing

How to make a barrel knot out of backing. The Barrel Knot is used by both nymph fishermen and dry fly fishermen alike. It can provide a stopping point for adjustable dry fly rigs or as an adjustable sighter for nymphing. Barrel knots are a simple knot consisting of 5 to 6 wraps that, essenciatally, wrap over itself to create tension. Many use this same knot in Euro Nymphing or tight-line nymphing techniques to place strategic sighters with 1-inch long tag ends on their leader for better visibility.
You can use any color backing line that you prefer as it won't likely detract from your overall presentation.
- Cut 8-inches or so of backing material.
- Hold the fly leader in your left hand and pinch the backing material section against it so that most of the backing material extends to your left.
- Take the left end of the backing section and create a loop down and over the leader and backing material itself. So you should have a loop below and the left end of the backing extending up over the leader and over the right side of the backing end.
- Feed the end of the backing material down and back through towards yourself. Make 5-6 wraps.
- Now, gently tug the knot tight by using the skinny end and butt end of the leader. Do not tighten the knot too much or it will prevent your knot from being able to slide up and down the leader. It should be tight enough where it doesn't slide on it's own during casting but loose enough to be repositioned with your hand.
- Trim the tag ends as you please. Most nymph fishermen like to leave a 1-inch tag on one or both of the ends.
1 comment
Ty, very easy to follow