How To Fly Fish With Nymphs: Everything You Need To Know
Nymphing techniques for trout are one of the most productive methods of fly fishing for catching fish. Dry fly fishing is considered the purest form of fishing by many fly fishermen. Nymphing or fishing flies subsurface, is looked down upon by many anglers. In some parts of certain fisheries, like the railroad ranch on Henry’s Fork, the unwritten law is that it is forbidden. Nonetheless, it is effective.
Table Of Contents
Why Is Nymphing The Best Approach?
Regardless of what others think, there is no doubt that nymphing techniques and fishing flies subsurface are extremely effective and the best option for fly fishing the majority of the time. After all, fish live underwater, so most of their meals are going to be taken subsurface. In fact, over 50% of their feeding is done subsurface. Simply put, give the fish what they are already eating where they are eating, aka nymphs, pupae, and larvae along the bottom. Eating aquatic insects submerged deep in the water column requires less energy than making their way to the surface to eat floating bugs.
It is safer too. Birds of prey are always searching for easy meals. While one could write an entire book on nymph fishing, the purpose of this article is to: demystify sub-surface fishing, give you some practical advice on nymph fishing gear, effective techniques, and advice on productive fly patterns.
Introduction To Nymphing Techniques
There are many different styles of nymph fishing techniques.
There is European nymphing, indicator nymphing, wet fly fish nymphing, and even nymphing shallow with dry dropper rigs.
Even within European nymphing, there are many different strategies and techniques such as Czech nymphing, Spanish nymphing, French nymphing, and Polish nymphing to name a few. We are going to stay away from European nymph fly fishing, and just discuss standard nymph fly fishing with an indicator and shallow subsurface nymphing.


What Is Nymph Fishing?
Nymphing is the act of presenting fly fishing flies beneath the water surface to imitate nymphal or larvae stages of aquatic insects and, on rare occasions, sunken flying insects. By using weighted flies or flies intended to sink, the objective of nymphing is to fish your fly fishing flies beneath the surface whether it is suspended within the water column or rolling along the bottom of the stream.
Usually, you’re not actively retrieving your line when nymphing but rather leaving your line in the water to represent an insect drifting lifeless in the water, called “dead-drifting.” There are instances where twitching or adding movement to your nymph flies may be effective, but don’t confuse nymphing with retrieving streamer flies such as swimming baitfish or minnow imitations. Instead, nymphing takes a more passive approach to fly fishing where you let the current do the work for you.

What Is A Nymph?
In simplistic terms, a nymph fly is a sinking type of fly fishing fly that imitates the naturally occurring insect larva and nymphal stages of aquatic insects commonly found in streams, rivers, ponds, and lakes.
Insect nymphs and larvae are commonly found under or on rocks, in aquatic vegetation, fallen tree branches in the water, and even in gravel, sand, or loose sediment.
They do not have wings nor can they fly in this insect stage. Instead, they scavenge and hunt for food by crawling along the streambed, which means they constantly live underwater. Because of this, all nymph patterns found in fly fishing are used to sink and to be fished under the water.
It is easy to understand nymphing if we have a better understanding of the life cycle of insects.
Recommended Reading: 15 Useful Explanations That Make Nymph Fly Fishing Stupid Simple

Look Under rocks
While it is not visible on the surface of the water, there is an entire world and self-sustaining ecosystem below the river’s surface. Aquatic insects are the lifeblood of a river’s ecosystem. They indicate the health of a fishery, and they also give life to most of the aquatic vertebrates that occupy the same space.
The main insects that trout fly fishermen should be interested in are mayflies, caddis flies, midges, and stoneflies. I am not going to go into each lifecycle here, but the important part is to understand that these insects spend the majority of their lives living under rocks, burrowed in the river substrate, or living in small cases built out of pebbles or detritus clinging to the underside of rocks or sticks. Flip a rock over and you will see many of the nymph or larval forms of these insects. In short, they are out of reach for trout as a meal.
Hatches depend on many factors, water temperature, and sunlight or the lack thereof being the most important, insects will begin the hatching process. They crawl out from under the rocks and start their migration process. They will either crawl along the bottom of the river stream side banks, or swim or float to the surface of the river using air bubbles trapped between their skin and nymphal shuck. These bubbles aid them in their quest to float vertically to the water’s surface.
This is the first time in their short lives that they are available to hungry trout as a meal. As they crawl out from under rocks, they are immediately met with the current of the river. This is important to note. Insects in the current will be moving at at the same speed as the flow of the water. If our flies do not match the identical speed of the current, then our flies will appear unnatural and will be refused by trout.
Nymphing requires the angler to understand the insect life cycle, and then present the flies at the correct depth and water speed as other natural insects in the water. Natural food items will be found drifting both shallow or deep. Observing what is happening on the water is critical to dialing in our presentation correctly.
Recommended Reading: Different Types of Fly Fishing Flies And How to Use Them

Tips For Fishing Nymphs Successfully
The first step in fly fishing nymphs is deciding when and where to fish them. This changes daily and hourly depending on the location and time of day you are angling. As a guide, my clients nymphed a large majority of the time because we usually started our day early to mid-morning. Here is how I generally approach a river from early in the day to late in the afternoon.
For this scenario, we’ll pretend that it is the middle of July when the peak of insect hatches are occurring.
First, when I pull up to the boat ramp in the morning and rig my gear, I usually arrive with nymphing flies in mind.
Before rigging my fly rods and readying the boat, I will make a short trip to the boat dock or down to streamside bushes. Look for spider webs on the dock, or give the stream side foliage a good shake. In either case, there is going to be evidence of what kind of insects we are potentially going to encounter during our day: yellow sallies, various caddis, various mayflies, and even small midges. These are the adult and sub-adult versions of the insects that hatched the prior day.
Nonetheless, we can match the general size of insects present, and know what hatches we are dealing with for that particular stretch of river. I will also watch the river for a few minutes. Are fish rising early in the morning? Usually, they are not, but if they are we may consider throwing dries. After gathering stream-side evidence, I will return to my boat and rig my fly rods with a two-fly, deep indicator nymph setup.
I’ll target the seam lines of where fast water meets slow water. These seam lines funnel food in a small channel that makes it easy for trout to feed from. Trout lie low along the bottom or in slower-moving currents while weaving in and out of these seam lines picking up bugs. Look to seamlines in areas that will make food readily available in riffles and along boulders, fallen trees, branches, undercut banks, etc. You’ll find most trout in places such as this.
Next, I’ll start from the backend of the section and work my way up casting my nymphing rig into these lines and letting the flies tumble along the bottom for hungry trout to gobble up.
Recommended Reading: How To Fly Fish A Two Fly Setup

What Is A Common Nymph Fly Fishing Setup?
Most fly anglers use two different ways to fly fish with nymphs. They either have some sort of strike indicator or fish with a tight-line technique. These strike indicators can be manufactured like the Oros strike indicator or it’s some sort of buoyant dry fly like a Chubby Chernobyl with the nymph flies below. Strike indicators are great for fishing from a distance and covering more water.
Now the alternative option, tight-line nymphing or Euro nymphing, does not have an accessory strike indicator (bobber) attached to the line. Instead, they focus on the ‘feel’ of the rod and watch the tension of their line to indicate a strike, which is far more sensitive than using a strike indicator accessory.
Recommended Reading: What Is Euro Style Nymphing And How Do You Euro Nymph?
Traditional Nymphing with an Indicator
There are a million different ways to rig a fly fishing rod and fly fishing gear. This is how I do mine, and this works well for me. Just a note, I use a standard floating fly line. A floating fly line allows for easier mends and a natural dead drift presentation. A fly line that is clean and floats well makes nymph fishing much easier.
For starters, we have to choose a leader. The leader is the long clear tapered line that we are going to attach our flies to. The leader attaches to the fly line via a handshake knot.
Leaders come to different lengths. I prefer a 3X or 4X size 7.5 foot mono leader. I like a shorter leader because we are going to add length to it with a section of tippet. Using a spool of fluorocarbon tippet, add another foot of tippet with a double overhand Surgeon’s Knot. If we choose a 3x leader, then use 4x tippet. If we choose a 4x leader, then I prefer to use 5x tippet. This ensures that our leader remains tapered and can transfer enough energy to present the flies to the target with accuracy.

Here’s How To Tie A Surgeon’s Knot
Tippet to Tippet / Tippet to Fly Leader
The Surgeon’s Knot is used to connect two separate sections of tippet together or tippet to your fly leader. Our staff uses this all the time out on the water to extend our leaders with a new section of tippet. This makes it easier for us to make delicate casts and make our leaders last longer.
It is not as strong as a Blood Knot but makes up for its lack of strength with how quickly you can tie the Surgeon’s Knot. It’s a rather easy knot to learn and is still decently strong.
- Position your new section of the tippet off to the right and the leader on the left. In this example please refer to the image above. Dark grey is your leader and light grey is your tippet.
- Roughly 3 to 4-inches of tippet and leader should be side-by-side.
- Pinch the leader and tippet together into a loop.
- Take the tag end of your leader and make two complete wraps around the inside of the loop.
- Next, take the long section of the tippet that extends off to the right and make two complete wraps around the inside of the loop over the top of the wraps you just made in Step 4 with the tag end of the leader.
- Finally, wet the knot and pull tight.
- Snip the tag end of the leader and tippet nearly flush with the knot.
Recommended Reading: Quick Guide To Tippet And What Sizes To Use

Adding A Strike Indicator
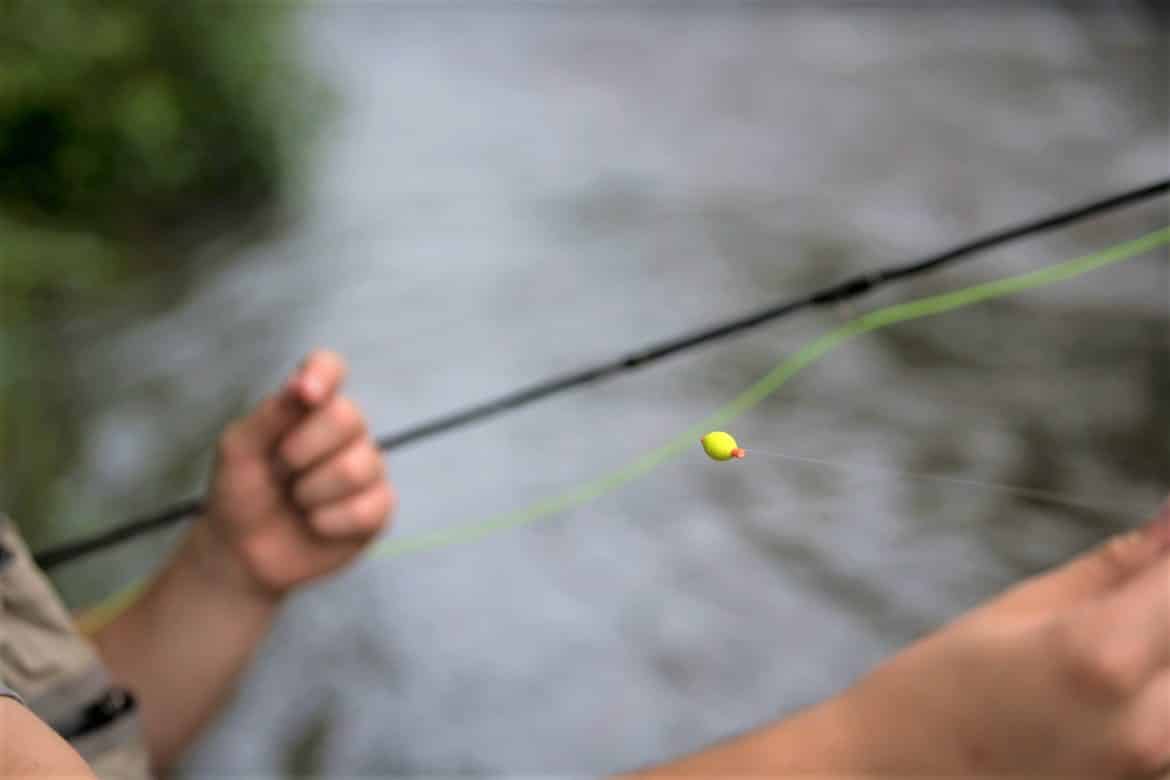
The last piece of fishing gear that we need to add is the strike indicator. Strike indicators are small plastic or foam floats that are added to the leader. The strike indicator acts similarly to a bobber in conventional fishing. Strike indicators allow fly fishermen to change the depth at which their flies are fished when fly fishing sub-surface nymphs.
Sliding the indicator up and down your leader will change the fly’s depths. Covering a wide range of water depths gives anglers flexibility and the ability to cover a wide range of fishing situations. In addition, they create a hinge point on the water. This is important when fly fishing slow pools, pocket water, or water that is farther from the angler. By lifting our rod tip high in the air, we can high stick our plastic line off the water. This reduces line drag and enables a more efficient natural drift. One trick is to pick out a bubble or piece of debris in the water. If your indicator is floating at the same speed as the bubble or flotsam, then you are achieving a natural drift without drag.
When a fish eats our nymph patterns sub-surface, the strike travels up the leader and is telegraphed by the strike indicator going under the water, twitching, or stopping. This lets the angler know to set the hook.
There are many different types of strike indicators, but I prefer the foam Oros version. These indicators are designed so that the leader runs through the middle of the indicator. This allows for better casting and eliminates leaders catching on exposed parts of the indicator.
As a general rule of thumb, most anglers prefer to place their indicators 1.5x the length of the depth of the water. We want our flies to drift naturally and skip off the bottom of the river rocks. Experiment with different depths by moving the indicator up and down.
If my initial nymph attempts are unsuccessful, then before I change the flies, I will change the depth of the flies by moving the indicator. Further tuning can be done by changing the weight of the split shot.
Recommended Reading: How To Fly Fish Nymphs Using Indicators In 4 Steps

Two Fly Weighted Nymph Presentations
Fishing two nymph flies is one of the most common fly fishing nymph setups. Fishing two nymph flies allows us to present two types of flies that cover different insect hatches. This doubles our odds of catching fish when we present two flies rather then just one. Choosing which fly goes first has advantages depending on the weight of the fly chosen.
Since we have an idea of what insects are in the river and hatching from our previous investigation, we need to choose our two flies. If you are fishing in unfamiliar water, then choose two fly patterns that are impressionistic in nature. Impressionistic flies cover a wide variety of insect species. An example of this type of fly would be a hare’s ear or pheasant tail.
A small pat’s rubber leg in sizes #6-#10 are excellent choices too. The Pat’s Rubber leg is my favorite point fly, or first fly that I attach to the leader. There are two reasons for this: first, they are heavy and help get the flies deep in the water column. Second, stoneflies are large meals and even if they are not actively hatching, hungry trout will still eat them.
If you are familiar with the river and water, or someone has given you advanced intel on what the fish are keyed into, choose a pattern that imitates a specific insect. An example of this would be a split case PMD or a Newberry’s Purdee John.

Placing the Larger Heavier Fly First
Now that we have selected two flies, we need to put the entire nymph rig together. Attach the first fly to the end of the tippet that we added earlier. This first fly is our larger heavier fly. As I mentioned, let’s pretend that we are choosing a large stonefly nymph like a Pat’s Rubber Leg. Tie this fly on with an Improved Clinch Knot. Next, we will attach our second fly. Using 18″-24″ of fluorocarbon tippet, tie the tippet to the first fly or point fly. We can attach the tippet in two different places on the point fly: the eye of the hook, or the bend of the hook

Improved Clinch Knot
Fly to Fly Leader
The Improved Clinch Knot is one of the most popular knots fishermen use to attach flies to your fly leader. It’s incredibly easy to tie the Improved Clinch Knot and is extremely strong. We use this knot every time we are out on the water and never have issues with breakages.
- Feed the end of your leader through the eye of the hook.
- Make 5-6 wraps around your leader while leaving a small loop at the front.
- Pass the end of the lead back through the small loop at the front made during Step 2.
- Pull it back through the large loop.
- Finally, wet the knot and pull tight.
- Snip the tag end of the leader and tippet nearly flush with the knot.
When nymph fly fishing, I prefer to tie the tippet to the eye of the hook. Our flies need to drift naturally in the river’s current. I believe that when tied to the bend of the hook, the back fly often acts as a rudder and creates drag on our point fly.
The purpose of the heavier point fly is to get the flies to the bottom of the river and into the strike zone. In my opinion and experience, most of my fish caught are on the smaller dropper nymph. I like to fish this rig when fishing shelves and targeting fish just on the shelf or on the back end of shelf drop-offs. Adjusting the indicator will allow the flies to just skim off the bottom of the river and fall naturally off the shelves. This is also the easiest rig to cast, so this is an excellent rig to start with if you are a beginner.

Drop Shot Nymph Rigs
The other option is to fish a drop shot rig with your heavier nymph as your second fly at the very bottom. This setup is slightly different, as it requires using the tag end of the additional tippet to add our other fly.
First, add 18″-28″ of tippet to the end of your leader using a Surgeon’s Knot. You will be left with two tag ends. Ensure that you leave one tag end that is 4″-5″ and clip the other. We will add our lighter smaller nymph to this tag end. It can be weighted or unweighted.
Next, you will add your larger fly. This is going to be a heavily weighted fly. I prefer nymph flies that are tied on jig hooks as they do not snag as easily. A jig head rubber leg or Jig head squirmy worm are both fine options. Even a heavily weighted San Juan worm will get the job done. The purpose of the heavier fly positioned second is to get the flies deep and for the heavier fly to make contact with the river bottom. The heavier fly bounces along the bottom of the river and the lighter fly on the tag end is fished higher in the water column. Lastly, add a strike indicator at 1.5 times the depth of the water you are fishing.
This an excellent rig when fishing pocket water, fast deep runs, and heavily pressured rivers. This is a less used presentation and as a result, it often produces more strikes in rivers with well educated fish. This rig is harder to cast and is more prone to tangles.

Adding weight to Your Nymph fly fishing Rig
The key to being successful at fishing nymphs is to get your nymph rig down deep to the fish. To reach deeper water and get the flies into the feeding lane, we often need to add weight. Even though we are fishing weighted flies, unless we are fishing shallow water, we will need to add non toxic split shot to our nymph setup to allow the flies to break through the water current and sink to depth.
Add split shot to your leader above the knot where we added the tippet in our nymph rig. This knot is important because it eliminates the shot from sliding down the leader to the lead fly. I prefer to add my knot to the leader at least 18″ to 24″ above my point fly.
How much weight do you add? This depends on the water depth and the speed of the current. There is no hard or fast rule. This is an area of nymph fly fishing that just requires time on the water and experience. I usually start with an AB or BB-weighted shot. If I am continually hanging up on rocks, moss, or snags in deep water, then I will adjust the weight and lighten it up by reducing the amount of split shot or using a smaller size.
Recommended Reading: Nymphing with Split Shots Makes All the Difference
Nymph Fly Fishing – Where Should You Fish?
Now that we have established our nymph setup, it is important to fish nymphs in the same location where natural insects are hatching. Although there might not be any visible bugs on the surface of the water, there is a lot happening deep in the water column. Identifying critical holding areas and reading water is critical for being successful in catching trout.
The first thing that I look for when choosing where to fish, is what kind of bugs are hatching or in the bushes. If stoneflies are hatching or grasshoppers are active, then I am going to focus most of my attention on the banks.
Focus your attention on the banks, because stoneflies and salmon flies are crawlers. This means that they leave the safety of the subsurface rocks and crawl at a 90-degree angle to the banks. Fish key in on this behavior and will follow them. This means that early in the summer when the water reaches 55 degrees, most of the fish will be tight to the bank waiting to intercept an easy meal. Not all banks are the same, for whatever reason, stoneflies love grassy banks. You will often see them in large numbers on the stalks of long green grass. These are areas that you want to pay close attention to.
Whether we are dry fly fishing or fishing nymphs we need our flies to be in tight to cover. I often tell my clients during this time or year, that if we are not losing flies we are not fishing close enough. In addition to the food source, overhanging bushes and cut banks give weary trout a respite from would be predators.
If mayflies are hatching, then I am going to focus my efforts on gravel bars. Mayflies thrive in gravel riffles, especially P.M.D.s and Blue Wing Olives. This is the opportunity to fish shelves, seams, and the backsides of pools. For fish to move into the shallow water, there needs to be a large amount of natural insects on the surface of the water. The risk-to-reward ratio just isn’t enough for fish to risk getting eaten by birds of prey.
Before an insect hatches, trout will hold in deeper areas off the back side of shelves, behind and in front of rocks, and in the backside of deeper pools. It is in these safer lies that they can take natural nymphs in the beginning phase of the hatch. Look for areas where natural ambushes can occur. This is often denoted by a change in watercolor.
Brown tinted or off-color water signifies shallow water. Blue or green water denotes a change in the water depth to deeper areas. These are ideal areas where a trout can lay in the safety of a deep hole and let the water current bring food to it. Only exposing itself for a brief second, it can eat food safely without expending much energy.
Mayflies emerge vertically in the water column. This means that we have to look for clues on where the fish might be eating. When this is occurring, you will see fish high in the water column and just below the surface of the water. This an opportunity for shallow nymphing.
Shallow Water Nymphing
Fly anglers should take note as to when the hatch begins to develop. This is obvious when fly fishing because anglers will start to see natural insects on the water. In addition, if you pay close attention, trout will start moving vertically in the water. They are looking up for natural insects. When this happens, usually mid-day, I like to consider going with a shallow nymph setup.
In this situation, when fish are rising or we can see active trout high in the water column, move the strike indicator down fish shallower water. It is possible to fish too deep and our flies will be passing under trout and out of the strike zone.

The Dry Dropper Rig – A Basic Setup
You could stay with a standard two-fly nymph rig like we discussed above, but in these situations, I prefer to go with a dry dropper setup. Fish will move up into gravel bars and shallower water to eat as the hatch develops. This rig allows us to target shallow water areas as well as pocket water. A dry dropper setup allows fly fishers to take advantage of the best of both worlds. We can nymph fish subsurface and also fish a dry fly pattern.
For this setup, I like fishing a heavier and shorter leader. I prefer a 7.5 3X leader. I will tie on a chubby chernobyl or some sort winged dry fly pattern that is capable of floating my weighted fly. Replace the indicator with a dry fly. This act as our indicator, but will also be used as a fly as well. More fish are usually taken with the nymph in my experience, but having a dry fly on the surface doubles our chances and covers our bases.
A weighted fly is important to get the pattern deep to the proper depth. We will not add weight like we did with our other nymph setup described above.
Tie a piece of fluorocarbon to the bend or eye of the dry fly’s hook. This can be 18″-36″ in length. The depth that you choose depends on where you are seeing fish in the water column and the conditions at that moment. Tie your nymph pattern to the end of the tippet and you are ready to fish.
There are many different fly patterns that are effective at catching trout. We will cover these in a depth in a minute, but a jig hook prince nymph, weighted caddis larva, and jig head hare’s ear are all effective impressionistic fly patterns that will land fish.
In some instances, trout will sometimes stop eating insects in the nymph stage and just eat dries and emergers on the surface of the water. This is the time to cut off the nymph and fish dry flies.
Recommended Reading: How to Make an Adjustable Dropper System

Nymph Fishing Techniques and Presentation
When wade fishing, we are going to want to present our flies with a drag free drift and allow the flies to sink to the correct depth.
Let’s quickly touch on how to achieve a “drag-free drift” through what’s called “mending” your fly line.
Mending is, in its simplest form, the act of adjusting your fly so that it drifts through the water in a natural way. You make little adjustments to your line and fly that helps it look more natural in the water. That means that your fly or rig isn’t being pulled through the water by your fly line or skating across the water (unless you want it to do that).
Mending: Mending is the act of using your rod to pick up and reposition your line against the current to perfectly present your flies with minimal drag.
To do a basic mend, all you’re really doing is lifting up your rod (and your fly line) and moving the line upriver (or downriver), in order to eliminate drag.
Recommended Reading: How to Mend Your Fly Fishing Line
Before you make your first cast, determine where the fish might be and then cast several feet upstream of their position. Not only do we not want to scare off any fish with your cast dropping directly on top of them, but we need time for the flies to sink down to where they are. That is why you need to cast several feet upstream.
Let’s walk through an example of how you might approach and fish an area on the water that holds some trout.
In this example, we will pretend that we are approaching a long riffle with a deep hole and tail out at the end. We assume based on the water depth and the lack of visibly feeding fish that there are trout holding in the safety of the deep pool. They are ambushing immature insects in the early nymph stage.
Approach the hole from downstream and behind. Trout always face into the current, so we position ourselves to the side of the fish, downstream, and slightly behind them. This gives us the best approach without spooking fish or allowing it to see us.
Strip off as much line as you need to make an upstream cast into the shallow part of the riffle. The shallow portion of the rifle is denoted by brownish rocks visible in the water. Make a cast up into the brown portion of the riffle, and let our flies drift downstream back towards us into the deep green water. Cast upstream of our target to allow the nymphs to sink to the fish deep in the water. It is critical to achieve a drag free drift while presenting nymph flies. This is known as a dead drift presentation.
As our line is floating towards us, slowly strip in slack with our left hand, which is naturally created when the fly line drifts back to us. Simultaneously, we slowly lift our rod tip higher into the air in order to help take the line off the water. Lifting the rod tip high is known as high sticking. This removes excess line off the water reducing drag. It also gives the angler greater leverage over the floating line, which allows us to effortlessly mend the fly line without moving or dragging the flies. A mend allows the angler to strategically position the fly line on the moving current so that it counteracts the effects of the current. This reduces drag on our line which reduces drag on the flies and allows for a natural presentation.
When the strike indicator goes underwater, twitches, or moves in an unnatural way then you set the hook. To set the hook, the movement needs to be fast and quick but not necessarily hard. A solid hook set can be attained by raising both hands above your head and forming a triangle in a swift manner. Make sure to keep the rod tip up and maintain pressure on the fly in the fish’s mouth.
The Lesinring Lift
If you want to catch more trout fly fishing, try the Leisenring Lift. The lifting motion simulates insects hatching and moving vertically in the water column. It is effective during both a mayfly or caddis hatch. Make your cast upstream to allow the flies to sink to depth. As your nymph flies drift toward you and just slightly past your position, slowly raise your rod tip up and purposely bring the flies to the surface of the water. This often induces strikes.
The Leisinring lift has other advantages too. It allows beginner anglers to hook more fish because the purposeful upward movement of the flies and the natural strike of the fish work in conjunction to allow trout to hook themselves.
Also, when nymphing subsurface flies, there is always going to be a natural swing of the flies to the surface of the water at the end of the drift. Utilizing a high stick purposeful lift through the water column allows anglers to tactically present subsurface flies to picky fish in specific places.
What Nymphs Should I Use?
Let’s go over what type of nymphs you’ll want to use throughout the season. You can fish the same nymph flies year-round, but certain ones will do better over different months just based on what’s hatching and what insects are developing. When it comes to nymphing, you’ll find that you can fish the same flies no matter what time of year it is, with just a few minor tweaks.
The good news is that spring fly fishing allows you to be more broad in fly selection as fast flows kick up larger nymphs. For example, stoneflies will also be on the move during their migration from their rocky riffles to the sandy, gravel shores. They are ever-present in streams as their lifecycle takes years to reach maturity. Eventually the current will be too strong and some stoneflies may lose grip on the sandy bottoms churning them up into the water column. In larger bodies of water, stoneflies can reach sizes up to a size #6 hook.
- Worm flies: Size #10 – #14
- Stoneflies: Size #8 – #14
- Nymphs: Size #12 – #18
- Midge Patterns: Size #16 – #22
- Caddis flies: Size #12 – #16
- Beetle / Ants: Size #10 – #16
Summer fly fishing is the ideal time to use dry-dropper rigs. This is where you position a high-floating dry fly at the top of your rig acting as your strike indicator while you tie nymph(s) below. Here’s a quick link on how to make an adjustable dry dropper rig. Trout are incredibly active as all major insect species are hatching. You can pretty much tie on any nymph you want and catch something as long as your strike indicator or dry dropper can support its weight. I tend to have the best success fishing nymphs between a size #14 and #22. This applies to almost all my fishing year-round. Use heavier nymph flies in deeper, faster flows after a rain or snowmelt.
- Worm flies: Size #10 – #14
- Stoneflies: Size #8 – #14
- Nymphs: Size #12 – #18
- Midge Patterns: Size #16 – #22
- Caddis flies: Size #12 – #16
- Beetle / Ants / Hoppers: Size #6 – #16
Fall fly fishing is an excellent time to work streamers (dead drifting), eggs, and larger patterns into your rigs. Dry flies are still very effective through to late fall. You can get away with fishing some larger nymphs on smaller streams. You can fish much larger nymphs on larger rivers. Towards the end of the fall season, you will want to start transitioning to smaller flies.
- Worm flies: Size #10 – #14
- Stoneflies: Size #8 – #14
- Nymphs: Size #12 – #18
- Eggs: Size #10 – #16
- Midge Patterns: Size #16 – #22
- Streamers: #2/0 – #10
- Caddis flies: Size #10 – #16
- Beetle / Ants / Hoppers: Size #6 – #16
Winter fly fishing is a much slower fishing season that requires smaller patterns. You can still do incredibly well on larger stonefly patterns and worms, but this will be far more common on larger rivers. In most small streams and rivers, smaller nymphs are going to outperform larger patterns. You can also do incredibly well in deep pools by swinging and slowly stripping in a heavy streamer. Try streamers with inverse hooks so the hook rides upright, such as a sculpin head fly. Plus, it is better to fish lighter, smaller weight tippets (5x and 6x tippets) as the slow and clearer water will make trout more weary of predators.
- Worm flies: Size #10 – #14
- Stoneflies: Size #10 – #14
- Nymphs: Size #14 – #22
- Midge Patterns: Size #18 – #24
- Streamers: #2 – #10
- Eggs: Size #10 – #16
Start with your confidence flies first and then change things up when needed. Try pairing a large stonefly pattern such as a Pat’s Rubber Legs with a smaller midge pattern or your favorite tungsten beaded nymph. Egg and worm patterns can be incredibly effective as a lead fly in your tandem rigs.
Popular Two Nymph Fly Combos
Combining multiple flies on a single rig allows you to test what trout are feeding on and it doubles your chances of catching trout. Plus, having more than one fly means more weight and a faster sink rate, which is great for fishing deeper pools or fast flows. Here are a few of my favorite fly combos I keep in my fly box that seem to always produce fish for me. Choose what works best for you and gain confidence in a wide range of fly patterns. Don’t be afraid to choose other nymphs and explore new patterns.


Rubber Leg and Split Back PMD
This is my go-to setup for mid-summer hatches. Usually, this time of year the P.M.D.s are on riffles and the golden stones are on the banks. This two fly combo can be fished in both areas and is extremely effective.


Worms and Eggs
The old bacon and egg combo cannot be beat in the springtime. Both forage items make for high-caloric meals that trout don’t often pass on. This is a great combo for spring runoff or in the fall season. You can fish egg and worm flies year-round. Some of the best times to fish this fly combo would be following a rain or snowmelt when flows are higher. Naturally, worms and eggs are dislodged from the river and into the current from increased water flows.
Recommended Reading: How to Fly Fish Squirmy Wormy Flies & How To Fly Fish Egg Flies


Cranefly Larva and CDC Soft Hackle Pheasant Tail
When fishing below tail-waters, especially in the West, crane fly larvae are often overlooked as an important forage item. They are usually present in large numbers and make an excellent trout meal. Most crane fly larva patterns are tied heavy, so they are wonderful point flies to get the flies down deep. You can also use a Mop fly or a Walt’s Worm as a crane fly larva, they have a similar shape and sink quickly. The CDC hackle pheasant tail pattern represents just about any small aquatic insect that might be present: caddis, yellow sallies, and many mayfly species. This combo is deadly throughout the year.


Walt’s Worm and Zebra Midge
No matter where you go or what time of year, this two-fly rig will bring results. Both flies are incredibly versatile and imitate aquatic insects that are present in all rivers and streams across the United States no matter the weather. I’d recommend positioning the Walt’s Worm at the very bottom of your rig while having the Zebra Midge above.
Fly Fishing Made Easy 👍
Our Quarterly Fly Club ships 1,000’s of flies to anglers all across the United States. Receive curated fly assortments selected for the season with in-depth articles on how to fish them. Great for beginners to learn and for intermediates to discover new flies.

